
Having to manage multiple clients, outreach campaigns, and teams can be stressful. But it is also usually a good sign.
It means business is doing great.
Luckily, Ninja Outreach helps alleviate the burden of managing multiple team members and projects so you can enjoy the benefit of growth without the hassle.
From finding leads, to outreach, relationship building, and campaign management – we’ve got you covered.
So with that in mind, read on as we walk you through the different methods you can use within the app to help you manage multifaceted campaigns.
How to Organize Different Campaigns Into Lists
Before anything else, you should have already integrated your email with NinjaOutreach.
Also, make sure you’ve already invited your team members to collaborate with you on certain projects.
Done?
Let’s start.
First, always group your leads into lists.
That way, you won’t mix up leads for Client A with leads you’ve gathered for Client B, or leads for a tech survey and leads for a fashion roundup.
Also, when it comes to creating your lists, you should have a designated pattern of file naming to keep everyone in your team on the same page..
It’s obvious enough, but in the midst of a ton of work, this simple fact is something most busy organizations tend to forget.
You can’t have Team Member A naming one list according to the date of a deadline while Team Member B names lists according to client name, can you?
It’s simple, actually.
When you’re finding leads for Client A, save your leads into a list and name that list accordingly.
If you’re finding leads for a particular campaign with a particular deadline, then give it an easily identifiable name.

You can always view the status of your various campaign projects by going to Lists > Lists of Leads

To edit leads in a particular list, go to List > Lists of Leads, then click the lead list you’d like to review.

Clicking the name of the list will take you to the leads section, where you will be able to review the leads or modify other data in that list.
Clicking the trash button of a lead card will remove that lead from your list.

Clicking the edit button will let you modify any other data related to that leads such as tags, notes, contact info, URLs, etc., while clicking the person icon will let you update your relationship status with the lead.
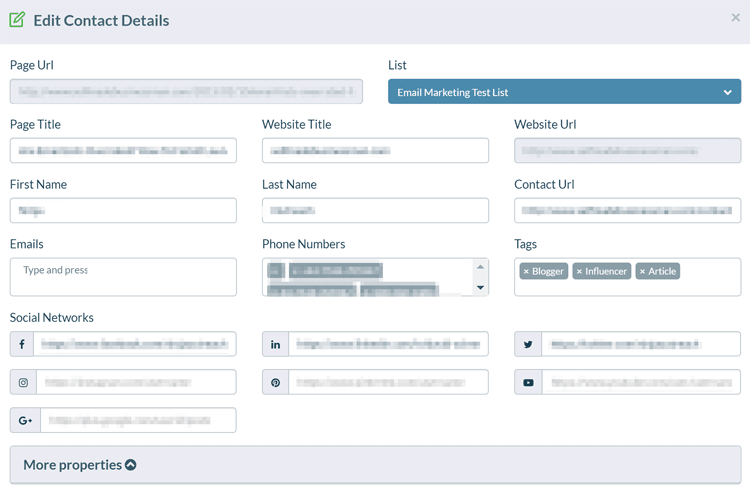
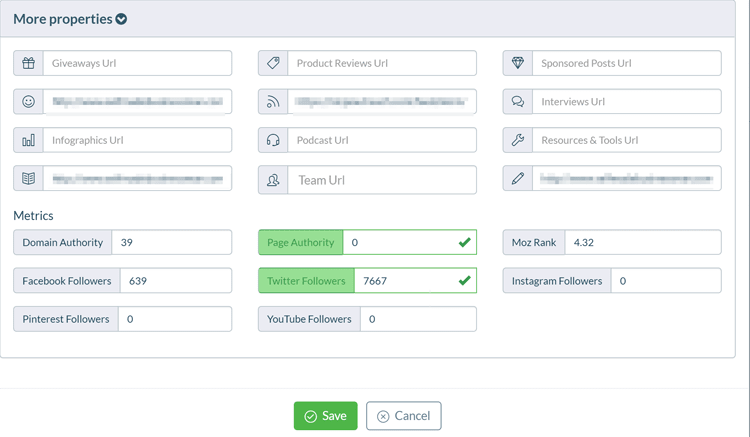
If you click on More properties, you can modify more of your lead’s data in this expanded section below:
Clicking on either of the tabs in the lead card will expand the card to display the data related to each of those tabs.
Clicking the Profile tab will show SEO and social media metrics.

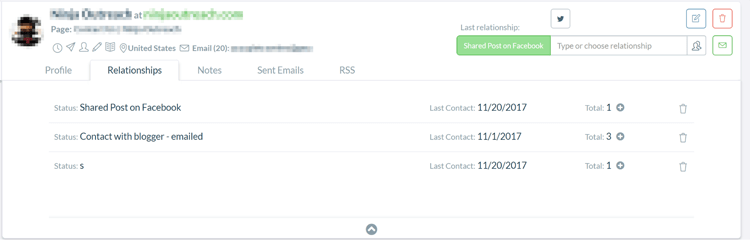
Clicking the Relationships tab will show the relationship history with the lead. (More on this later.)
Clicking notes will show other instructions related to the lead that can’t be condensed into tags or relationship labels.
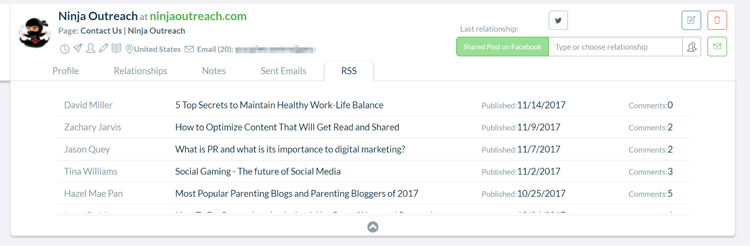
If you have a website URL saved in your lead’s card, clicking RSS will show the RSS feed of this website, or its latest posts.
You can also select multiple lists at once, for example, all the lists belonging to one client.

Next, let’s take a look at how you can keep multiple teammates on the same page for projects you handle together.
How to Effectively Collaborate with Teammates
According to a principle coined in the ‘70s, adding too many people to a project could ultimately end up slowing it down.
This principle is called Brooks’ Law, and it was originally applied to software project management.
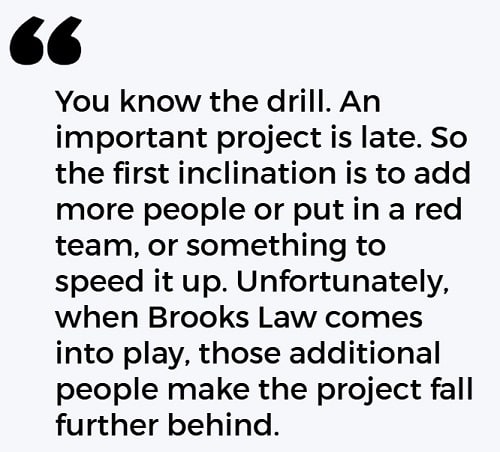
Evidently, this also applies to most collaborative projects.
But if you need to accomplish bigger things for more clients, you can’t subsist on only one team—let alone one person.
So if you’re to hire more people, how do you work around these aforementioned project management setbacks?
Our answer: Try to leave as many points of reference for each other as you can.
To alleviate that, we allow notes, tags, and relationship statuses in the tool.
Tags are labels attached to a lead for the purpose of easier identification.
You can use these tags to help you get more accurate and filtered search for leads such as tags for niche, location, or prices ($50-$100, $100-$200) that the influencer charges.
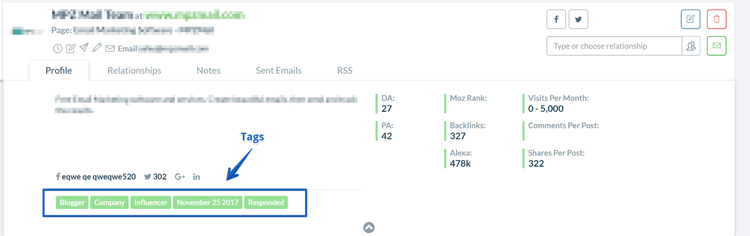
Ex. Blogger, Influencer, Executive, etc.
Relationship Status shows a relationship between you and a lead. It can depict your relationship history with a lead, but should ideally be used more to indicate where the lead sits in relation to the campaign itself.

Ex. Emailed, Replied, Followup due (3, 7, 14 Days), Clicked a link, Blogger agreed to guest post, Left a comment on their blog, Shared post on Twitter, Contact with blogger – Skype/phone, etc.
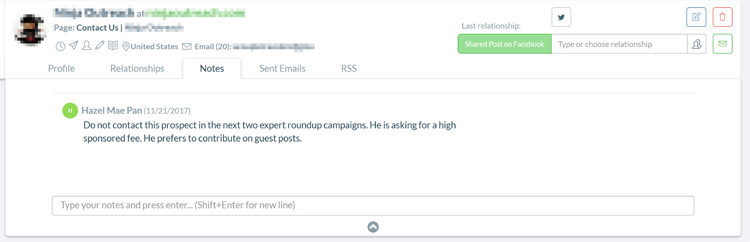
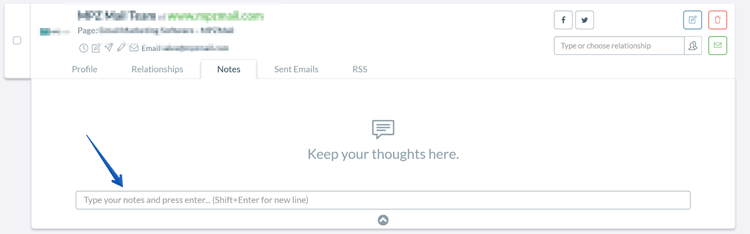
Notes are things that can’t really be explained in a few words and therefore don’t make good tags or relationships.
So, there is an area reserved for these custom descriptions in each lead card that you or a teammate can type in.
Ex.
Do not contact this lead in the next two expert roundup campaigns. He is asking for a high
sponsored fee. He prefers to contribute on guest posts.
Do not contact this lead in the next product review campaign. She is not interested in this kind of campaign because she thinks that is a complete waste of time.
Tips on using Tags, Relationship Statuses, and Notes
Tip 1. Define tags and relationship status nomenclature across all team members so everyone is using the same keywords/terms otherwise to avoid confusion.
Tip 2. Create a general document for reference where all the different ‘types’ of tags and relationship statuses are defined.
Tip 3. When starting a new campaign, clear the previous relationship status so that the outreach coordinator starts fresh.
Tip 4. Do not clear any global definition tags that apply to the influencer in any case, such as tags like Blogger, Influencer, Tech Journalist, and the like. Delete things that change like prices, location, or response deadlines.
Now, imagine this scenario:
You’ve just finished an outreach campaign and you’ve already gotten some replies.
One of the leads has agreed to publish a guest post from you, and wants you to send some topic ideas and outlines by a certain date.
Another team member is in charge of content, so you have to leave her this information.
So, go to the Lists > Lists of Lead tab, and choose the list that this lead belongs to.

Hover over the lead’s card and click Notes. This enlarges the card and lets you type your notes into the input field.
For example, you can address your teammate (let’s call her Hannah) and say something like: “Hey Hannah, this blogger has agreed to let us guest post in his blog.
He wants us to send him some topic with outline ideas by [date].
If you click enter, NinjaOutreach will save the notes and even record the date the note was made and who made it.
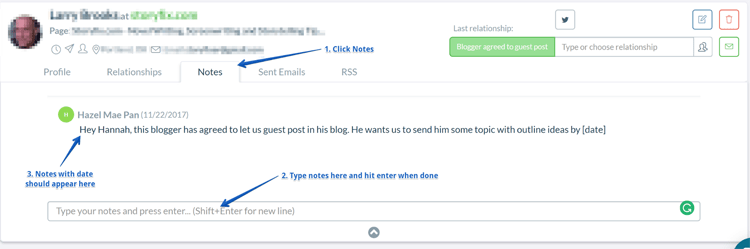
So now, you’ve successfully left instructions for your teammate, Hannah.
As soon as Hannah becomes available, she can access it on her own time without you having to wait for her or get pulled out of a new task you’re working on just to brief her.
But before you leave this task, there’s something else you should know, and that’s how to update Relationship labels.
How to manage Relationship statuses with leads
NinjaOutreach has a few ways of filtering leads.
Let’s start with two: The Relationship label, and tags.
The Relationship label lets you add a tag to define the progress of your relationship with a lead.
Have you already sent an email to this and this lead?
Has this and this lead already replied, declined, agreed to your proposal? Is this lead completely fresh?
For some things we automatically handle it, such as contacting the lead by email.
But other things like agreements / negotiations need to be manually added.
We offer many built in options, and you can also create custom Relationship statuses.
Tagging is used mostly to assign a category to your leads.
Is the lead an influencer, a blogger, a journalist, an agency?
When is the deadline to submit an article to this lead? What niche are they in?
These are just some of the attributes you can tag using the Relationship label and tags, which of course are fully filterable.
To know more about how our filters work, follow this link.
Now, let’s look at a scenario where you can apply Relationship labels and tagging filters.
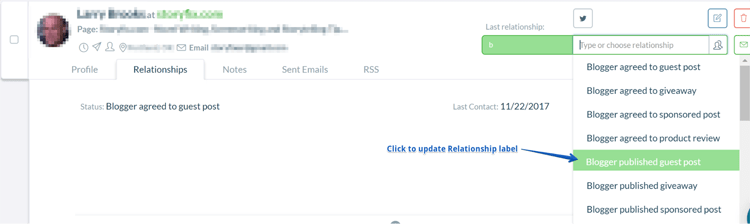
Let’s say you’ve submitted your guest post and your lead has since published it.
Once a development like this happens with any lead, you should update your Relationship label to reflect the progress.
To do that, go to your lead’s card, click the down-facing arrow at the upper right hand corner of the lead card, and choose the right Relationship label.
In this case, choose “Blogger published guest post” from the dropdown.
You can also do this in bulk for for multiple leads. So if, say, two (or more) leads agreed to accept your guest post, just click the boxes at the upper left corner of each lead’s card.
Once you’re done ticking the boxes off all leads you need to include, click the edit button at the top (not the edit button in the lead cards).

Go to the Relationships section, open the dropdown, and choose the correct Relationship label. Click save.

How to manage Relationship labels of your leads.
Let’s move on to another scenario.
The time is right, and you’re ready to send your second batch of outreach messages to your newly added leads.
How do you do that without including the ones you’ve already contacted before?
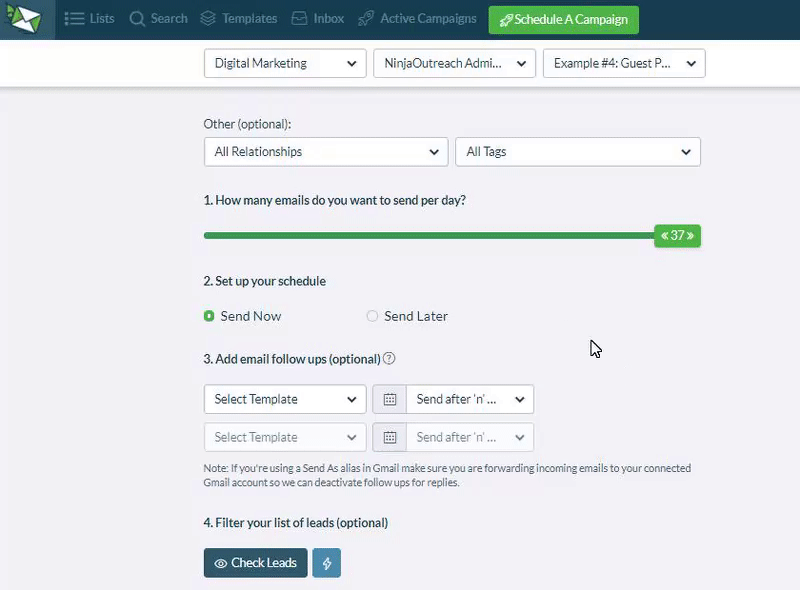
A quick way to do that is to use the quick alerts button (lightning bolt when setting up an auto campaign).
Click Schedule a Campaign

Choose the correct lead list you want to send your outreach emails to, the email address you will use to send your emails, and your preferred email template.

As you go through the campaign setup process, you’ll see a lighting bolt icon below Step 4.
Toggle the bar to the left if you don’t want to include leads you’ve previously contacted, and to the right (the bar will turn green) if otherwise.
Final words
So now you know how to use the features we specifically built to help you get through common scenarios you may come across while using NinjaOutreach.
If you encounter anything new that this tutorial may have failed to cover (although we doubt it), our Customer Support Ninjas are always available to help.