There are a million ways to drive traffic to a blog, and traffic generation can be from any source provided that one can spot the Traffic generation opportunity. One of the million ways to drive traffic to your blog is through images.

Google image search records over a billion page views per day, this shows that Google image search can be a source of good traffic to our blogs if we know how to take advantage of the opportunity it presents.
Most bloggers don’t optimize their blogs for rankings on image search except for those that have a photo blog, but believe me; you can get a handful of more traffic by optimizing your images for image search rankings.
In all my years as a blogger, I have not really paid keen attention to image search engine optimization (image SEO), I only apply some of the basic image SEO tips whenever I feel like doing it until recently when I felt I should perform some experiment with image SEO to see the results it will yield.
So, I put on my thinking cap and started brainstorming and experimenting with image SEO until I found what was actually working.
After about 24 hrs of implementing the SEO strategies that I will be sharing with you, I got referral traffic from Google images search to my blog for the very first time.
My analytics report indicated that I got 20 visits from Google image search in less than 24 hrs of optimization.
I know some bloggers & webmasters are skeptical about the traffic image search can be, but I believe it is a personal decision to decide if image search traffic will be beneficial to you or not.
This image SEO guide will be helpful to everyone especially photo-bloggers and lots of SEOers out there that will love to generate traffic from Google image Search engine.
If you are interested in getting more traffic from image search, then read on and implement the strategies that I have outlined in this guide to get your images ranked and index in image search engines.
I will be dividing this guide into two parts, the first part is the On-page image optimization and the second part is Getting your image Indexed.
The two parts of the guide are very important and they both rely on each other for your images to perform well in image search results, so don’t skip any part of this guide!
On-Page Image SEO for Better Image Rankings
In this first aspect, I will show you how to do on-page optimization for your images to improve your rankings on image search.
Before we move forward, I will like you to know that image size do have an effect on your image rankings and your overall image SEO effort, so I will advise you to stay clear of images with large sizes on your website which will have a negative impact on your page load times.
There are numerous tools, softwares and photo editors that you can use to reduce your image file size before uploading them to your blog or website. You can use tools like Picnik and Image Optimizer to achieve this.
Having said that, let us now discuss the crucial aspects of On-Page Image Search Engine optimization.
Image name / Image Filename
Your image filename is the foremost important aspect of image SEO, and it influences your image rankings in image search significantly. if you take a closer look at images that rank well on image search, you will discover that they usually have the search keyword as the image name which helps them rank better.
The image name is the name given to your images on your PC desktop before you upload them onto your blog. Usually, when you take pictures with your digital camera or Phones, they are given a default generic name which is usually alpha-numeric and bad for Image SEO.
Most pictures on your PC and Phones will have a name like “dsc004451.jpg” or BTT100-13.jpg” which is very important for you to change before you use such images on your blog.
For you to get better rankings for your images, you should change the image name to your target keyword for that particular post or page in which the image will be published so that when you upload the image to your blog, you will have the filename in the form of “www.yourdomain.com/images/image-seo.jpg” and not “www.yourdomain.com/images/BTT100-13.jpg”.
This way, you have given a description of the image and also name the image description in the URL which helps search engine crawlers to pick things fast and rank your image for the proper keyword.
Tip: to change your image filename, just right-click on the image on your desktop and select rename from the list of options that comes up and change the filename to your desired keyword.
Alt Tags Attribute
Using alt tags attribute is also an important aspect of image SEO that should not be ignored. Alt tags are a way of attributing text to your images. Alt text the text that the search engine uses to understand images.
Alt tags serve three important purposes; the first is to associate your image with a set of text.
The second is to give search engines a kind of information to use as an anchor text if the image is used as a link.
The third is to give your readers a brief description of what the image stands for if they have images disabled on their browser or if they are on a slow bandwidth.
To add Alt text to images, you simply add alt=”this is your alt text” to your image tag. Here’s an example using the image above:
<img src=”http://www.bloggingtipstoday.com/wp-content/uploads/2013/07/image-seo-guide.png” alt=”image SEO guide” />
The key to writing a good Alt text is to:
- Make sure it is Short
- Make sure that it is keyword Rich
- It actually describes the image and not just keyword stuffed text.
You can check out this image by Google’s Engineer, Matt Cutts, where he explains the importance of ALT tags.
The title tag Attribute
The title tag attribute is yet another important aspect of image SEO you should not ignore.
The title attribute attached or assigned to a picture is the text that appears on such pictures when you hover your mouse over the image.
Apart from the appearance of the image title when your mouse hovers on the picture, it also holds a considerable SEO value because it helps to describe to search engines what the image stands for and this further helps to increase your chance of ranking that image in image search engines.
Add Content around Images
This particular point is very important for photobloggers out there and people who have image galleries on their website.
If you run a photo blog or image gallery type of blog, make sure you add content (texts) on pages where your images appear. Don’t just upload your images and publish it like that, rather write a short copy describing the image with your keywords in it and put it around your image.
You can come up with a description of the image in 100-200 words and put it before or after the image on that particular page. This will help Google to rank your image better and put your image in context.
This is a crucial image SEO factor that you should not ignore, especially photo-bloggers.
Check this video by Google Matt Cutts on the use of page copy with images.
Use unique Images
We have heard of Google Panda updates that target duplicate contents and low-quality pages. Google is getting better with image search Algo and believe me, I know they working hard to rid their image search results of duplicate images.
So if you want your images to rank well in image search, make sure your images are unique; try to create your own images that will be unique to your blog and don’t forget to watermark your images with your URL where necessary to protect your images from theft.
Above are the important On-Page Image SEO tactics you should implement, but before I move to the indexing part, I will like to share with you how to automate some of the processes I shared above.
This will be very useful for bloggers that use the self-hosted WordPress blogging platform to power their blog.
How to Automate your On-Page Image SEO
Automating your images on-page SEO can be done with the help of either of these two plugins: WordPress SEO For Image plugin or SEO Friendly Images plugins. These two plugins will help you to automatically include the missing alt tags of your images.
If your images do not have ALT and TITLE already set, these plugins will add them according to the options you set.
The two plugins are free and easy to setup. Just download and install them on your blog.
Getting Your Image Indexed
This is the icing on the cake for this image SEO guide!
Most Image SEO guide out there will only talk about how to do your on-page image SEO but they will never talk about how to get your images indexed. If your images are not indexed in Google and other search engines, then all your effort expended on optimizing your images for better rankings is a waste.
You can never get traffic or better rankings if your blog images are not indexed likewise you cannot get good rankings if your images are indexed but no proper on-page image SEO.
What I am trying to let you know is that the two aspects of this guide works hand in hand and they rely on each other for a perfect Image SEO strategy. I will show you in a step by step guide method of getting your images indexed.
STEP 1 – Create an Image XML Sitemap
Creating an Image XML sitemap did not come easy for me because I didn’t know which plugin to use and which one actually works! I used a couple of plugins in the past, but all of them were CRAP! until I found Udinra All Image Sitemap plugin and gave it a try & it worked well.
This plugin will Automatically creates Google XML sitemap for images and pings Google, Bing and Ask.com.
Install this plugin on your blog, after installing it, you need to go to the plugins settings page to activate and create the Image sitemap for the first time. The plugin won’t start working until you do this.
STEP 2 – Go to Google Webmaster Tools
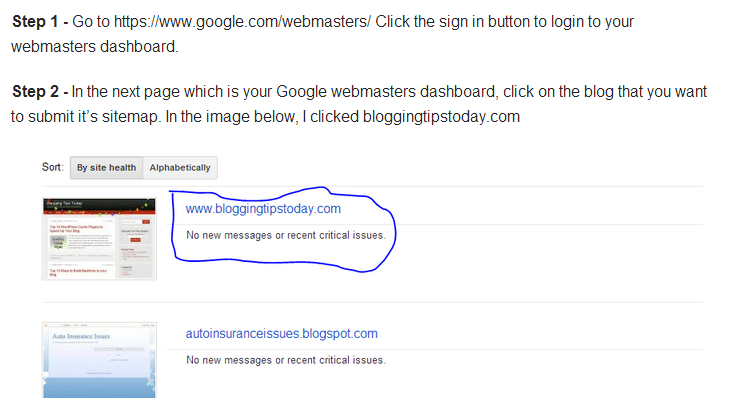
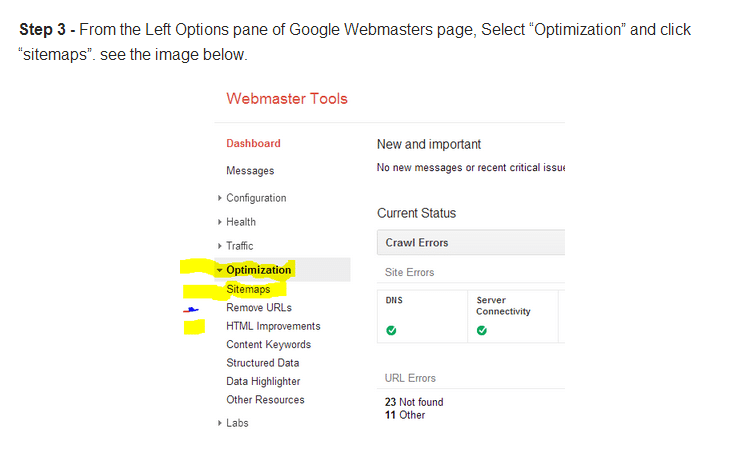
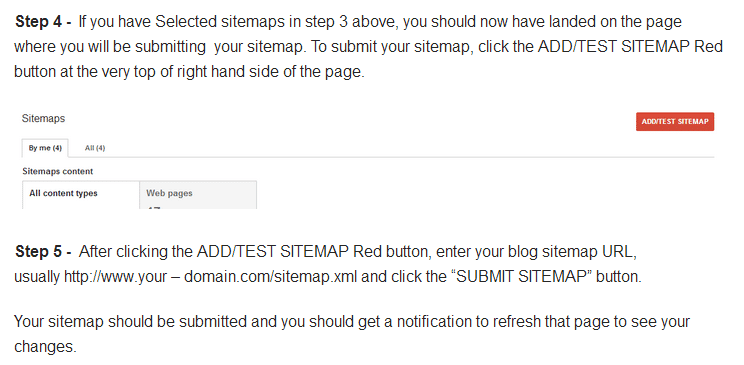
The next thing to do after creating your image sitemap is to head over to the Google Webmaster tools. login to your Webmaster tools account and navigate to the sitemap section and add your images sitemap to the sitemap crawl list.
I did a detailed post on submitting your blog sitemap to Webmaster tools before, but I will still share screen shots of the post here for you to see how to do it.


From the Image above, you will see that the sitemap URL is – http://www.your – domain.com/sitemap.xml, that is for your normal post sitemap, for your image sitemap, you will change it to http://www.yourdomain.com/sitemap-image.xml.
Final Words
Optimizing your images for better rankings is a great way to get more traffic to your blog; don’t just care about writing great contents, but also care about optimizing your images too.
The tactics that I have shared in this guide are all what I have been using for my image SEO, I believe these tactics will work for you, and when they do, don’t hesitate to send me a mail about it or buy me a cup of coffee 😉 😀
What other tactics can you use to optimize your images? Share them with us in the comments.

